Category: android
Android Back button does not navigate between bottom navigation bar views
I implemented a bottom navigation bar with multiple fragments. When selecting each view, I added the fragment to the back stack with transaction.addToBackStack(null). However, when I pressed the back button the fragments switched but the menu item in the navigation bar would not highlight.
Apparently, Material design guidelines state “On Android, the Back button does not navigate between bottom navigation bar views.”
As a result I needed to remove the call to addToBackStack as the proper behavior is for the back button to go to the previous app or activity.
Location of Android SDK folder on Mac
To determine where the Android SDK folder on your computer is located open Android Studio. Press the Android Studio menu in the toolbar and search for “Android SDK” or navigate there via Appearance & Behavior, System Settings, Android SDK.
The location of the folder is located in the text box near the top that says “Android SDK Location”.
By default the Android SDK location is stored at “/Users/[USER]/Library/Android/sdk” or at “/Library/Android/sdk/”.
How to get expansion APK files with downloader library and market licensing modules to work in Android Studio
Google gives an overview of what expansion APK files are along with some sample code. However, getting started can be tricky. Here is an easier to understand set of instructions for importing the necessary libraries as modules in Android Studio.
The following instructions were tested with Android Studio version 2.2.3 on a mac. Note that on a mac the Android sdk folder is at /Library/Android/sdk/ or at /Users/[USER]/Library/Android/sdk/.
Download libraries
- Android Studio…Preferences…Appearance & Behavior…System Settings…Android SDK.
- Under SDK Tools, select “Google Play APK Expansion library” and “Google Play Licensing Library”. Press Apply to install packages… Accept License and Install.
Import market_licensing library
- File…New…Import Module…
- Browse to <ANDROID_SDK>/extras/google/market_licensing/library/, Press Open.
- Rename Module name from library to market_licensing, Press Next, then Finish
Import downloader_library
- Open the <ANDROID_SDK>/extras/google/market_apk_expansion/downloader_library/project.properties file and delete the last line that reads “
android.library.reference.1=../market_licensing.” - File…New…Import Module…
- Browse to <ANDROID_SDK>/extras/google/market_apk_expansion/downloader_library/, Press Open, then Next, then Finish
iOS views/APIs and their corresponding Android views/APIs
If you are used to programming in iOS and need to write an Android app or vice versa here is a list of iOS views and their equivalent views on android. You can also use this list to infer the corresponding View Controller and Activity.
| iOS |
| UITableView |
| UICollectionView |
API’s below
| iOS |
| MPNowPlayingInfoCenter |
| MPRemoteCommandCenter |
| NSNotificationCenter |
| NSTimer |
Category: arduino
Equipping your workbench for beginner electronics (Arduino)
Are you learning Arduino or how to solder electronics? I have compiled a list of items that I have personally found useful when I received an Arduino Uno kit for Christmas and started learning how to make things with it.
Lighting
You’ll want a couple of bright lights to help you see all the small components. If you don’t already have a desk light handy I found these two lights to be useful and inexpensive. Plus the architect lamp reminds me of the Pixar lamp.
Control LED light color via an Arduino and an iPhone over BLE
This tutorial will show you how to control an RGB LED via an Arduino and an iOS device. It will utilize the LightShow app which lets you set a single color or create a light show with a sequence of colors.
If you want to control a Light Strip check out this tutorial instead.

Materials:
iOS device
Create your own LED light show with an Arduino and an iPhone


This tutorial will show you how to control an analog RGB LED light strip via an Arduino and an iOS device. It will use the LightShow app which lets you set a single color or create a light show with a sequence of colors.
Materials:
- Analog SMD RGB LED Strip
- 3 x N-channel power MOSFET
- 12V power supply
- DC Barrel Jack Adapter
- nRF8001 BLE board
- Arduino Uno
- iOS device
- LightShow App
Step 1: Attach the light strip
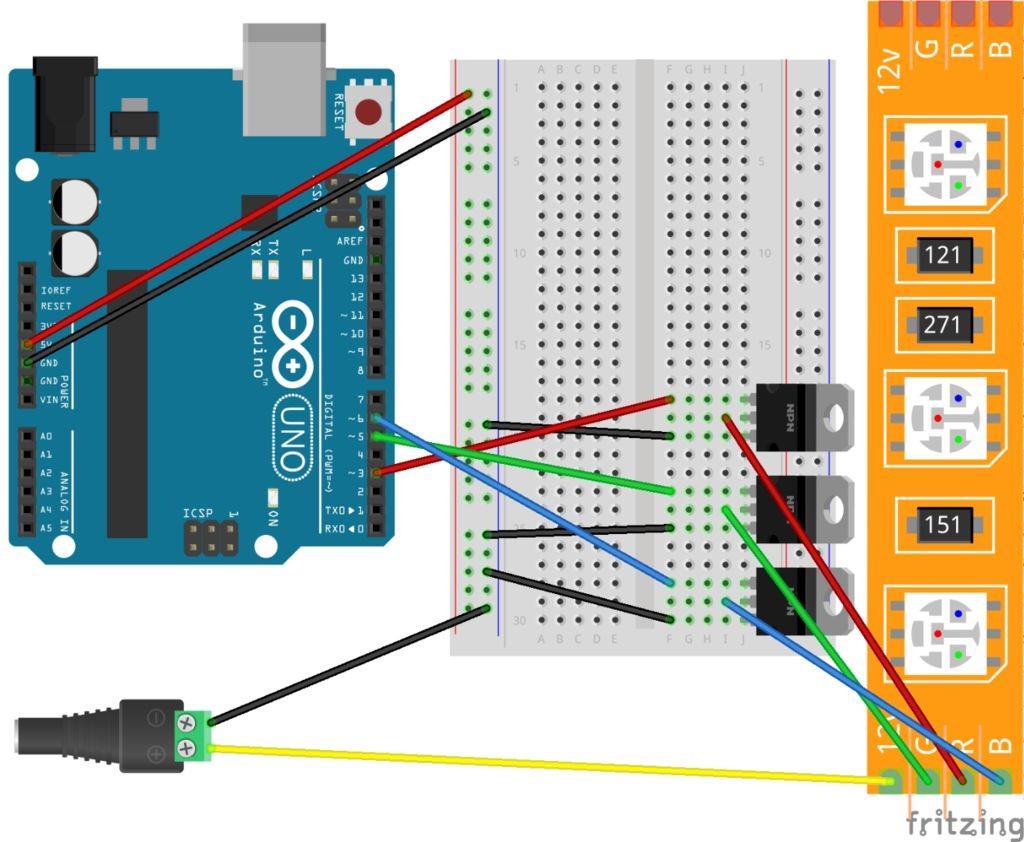

Use a power transistor such as a N-Channel MOSFET between the Arduino and the light strip.
Category: business
Best credit card for PPC advertising such as Google Adwords, Facebook Ads or Apple Search Ads
If you use online advertising to promote your apps, goods, or services it might be beneficial to use a credit card that gives you extra points for spending money on online advertising. The Chase Ink Business Preferred is one of the best business cards you can get.
The Chase Ink Business Preferred credit card awards 3 points for spending in the following categories:
- advertising purchases made with social media sites and search engines
- shipping
- travel
- internet, cable, and phone services
This is great if you advertise online with advertisers such as the following.
Calculate how much you spent on Amazon.com and paid in Sales Tax
If you are doing your taxes or you are just curious to see how much you spend on Amazon.com you might find the Order History Reports feature useful.
If you are filing your US federal income taxes and are taking the state sales tax deduction, you can use the report tool to quickly and easily calculate how much sales tax you paid on Amazon.com.
To get the .csv report go to Order History Reports and select the “Items” Report Type, along with a start and end date, or simply press one of the “Quick Set Options” such as “Last Year”. After the report finishes generating you can open it in excel or numbers and add a footer field where you can calculate the SUM of the “Item Subtotal Tax” and “Item Total” columns.
Category: devops
Nginx configuration for secure go server behind a proxy
It is good practice to run your go web server in a non-root environment. However, if your web server isn’t root then it can’t bind to port 80. One solution is to use nginx as a proxy to listen on ports 80 and 443 for http/https traffic and forward them to your go server running on a higher port such has 8000, 8080 or 9000.
Digital Ocean has a good tutorial on how to install Nginx. It also has a good tutorial on setting up your SSL certificates. I recommend using namecheap to purchase your SSL certificates.
How to Fix the Error Establishing a Database Connection in WordPress
If your WordPress server works normal for a few days and then shows the error message “Error Establishing a Database Connection” it is most likely due to heavy load to your website that your server could not handle. The extra load could be due to a lot of traffic from an incoming link or it could be a malicious actor attempting to brute force their way into your WordPress installation. If you have control of the server such as on AWS or Digital Ocean you can ssh into the server and restart the machine. But that fix is only temporary.
Category: go
Go Build Error - Too Many Open Files
I received the following go build error on my Mac. However, the same code ran fine on a linux server.
ERROR build.go:386: Failed to parse build errors error=“go tool compile: fork/exec /usr/local/go/pkg/tool/darwin_amd64/compile: too many open files\n”
ERROR harness.go:219: Build detected an error error=“Go Compilation Error: See console for build error.”
The problem was the mac os open files limit was set too low at 256. To solve the problem I modified the .bashrc file to increase the amount of open files allowed to over a million. I added the following line to the .bashrc file:
Category: hacks
How to create custom keyboard shortcuts for any Mac Application
Have you ever wanted to create a custom keyboard shortcut for a Mac App but the app you’re using doesn’t let you modify their keymap or perhaps their interface is too cumbersome to use?
For example, if you are running the Google Chrome internet browser on your Mac and you want to refresh the page with the F5 key, there is no way to do that from within Google Chrome.
How to hack a Sony STRDN1060 receiver and remote to show custom input names
I have a Sony STRDN1060 Receiver and although I have a universal remote (Logitech Harmony 650) which I like very much, I find myself still using the Sony remote to switch inputs. However, the default inputs labels of SAT/CATV, GAME, SA-CD/CD didn’t really match up to the actual devices I had hooked up to those HDMI ports. I have a TiVo, chromecast, and an Apple TV.
In order to simplify my life so I don’t have to remember which input matched up to which device, I used a label maker (Brother Printer PTD600 PC) to change the labels on the remote. I also used the sony web interface to change the lcd outputs on the receiver.
Category: ios development
Start MySQl from command line on Mac
Sometimes MySQL seems to have trouble starting up automatically. Even though I have the setting for MySql set to start up automatically via the checkbox “Automatically Start MySQL Server on Startup” in System Prefrences - MySQL. Even pressing the “Start MysSQL Server” button doesn’t work.
When this happens I find it useful to start up MySql via the command line. To do this I execute
/usr/local/mysql/support-files/mysql.server start
Either this is successful and it will say:
iOS and Android Mobile Device Frames for Screenshots
As you near the end of a release cycle for your mobile iOS or Android app you will need to take screenshots to include in the App Store listing.
Many decide to dress up their screenshots with device frames. Here is a list of sites that provide iPhone, iPad, and Android device frames that can be used in your App Store screenshots.
Facebook design site at https://facebook.design/devices includes frames for:
- Apple Thunderbolt
- Apple Watch
- Galaxy phones
- Google Pixel phones
- iMac
- iPad
- iPhone
- Nexus phones
- Surface tablets
- and much more
Apple’s developer website at https://developer.apple.com/app-store/marketing/guidelines/#section-products includes Apple product images for most of their devices with screens.
Create Apple Search Ads for Multiple Countries (Storefronts)
When Apple Search Ads launched in October 2016 it only displayed ads in the United States. However, it expanded to multiple English speaking countries on April 25, 2017 to include the United Kingdom, Australia, and New Zealand. Each country is represented by a different storefront and to get your ad to display in each storefront you need to create a separate campaign for each country.
By August 1, 2018, Apple Search Ads expanded to include France, Germany, Italy, Japan, Mexico, South Korea, Spain and Switzerland.
‘CurveEaseInOut’ is unavailable: use [] to construct an empty option set
Swift 3 removed CurveEaseInOut so you will get the error message “‘CurveEaseInOut’ is unavailable: use [] to construct an empty option set”
Replace
UIViewAnimationOptions.CurveEaseInOut
with
[.curveEaseIn, .curveEaseOut]
‘CGSizeMake’ is unavailable in Swift
Swift 3 removed CGSizeMake. You will get the error message “‘CGSizeMake’ is unavailable in Swift”. To resolve this replace:
CGSizeMake(100, 200)
with
CGSize(width: 100, height: 200)
How to fix target overrides the `ALWAYS_EMBED_SWIFT_STANDARD_LIBRARIES` build setting defined in `Pods/Target Support Files/…`
If you are using swift and CocoaPods you may get the following warning after running pod install or pod update:
[!] The target overrides the ALWAYS_EMBED_SWIFT_STANDARD_LIBRARIES build setting defined in Pods/Target Support Files/…. This can lead to problems with the CocoaPods installation
The warning message then gives the following two suggestions:
- Use the $(inherited) flag, or
- Remove the build settings from the target.
To implement the first suggestion of using the `$(inherited)` flag follow the steps below:
How to fix the Swift 4 @objc inference warning
After installing Xcode 9 and migrating to Swift 4 from Swift 3 I received this warning:
The use of Swift 3 @objc inference in Swift 4 mode is deprecated. Please address deprecated @objc inference warnings, test your code with “Use of deprecated Swift 3 @objc inference” logging enabled, and then disable inference by changing the “Swift 3 @objc Inference” build setting to “Default” for the “AppName” target.
I resolved this issue by going to the projects build target. Selecting “Build Settings”. Searching for “Inference” then changing the setting for “Swift 3 @objc Inference” from “On” to “Default”. If you have multiple targets in your project you may have to do this for each target.
Swift 4 substring
After converting my Swift 3 project to Swift 4 I received the warning:
‘substring(from:)’ is deprecated: Please use String slicing subscript with a ‘partial range from’ operator.
The old Swift 3 code was
let range = str.range(of:"Some ")
let index = range!.upperBound
let subStr = str.substring(from: index)
The new Swift 4 code for substring is:
let str = "Some String"
let range = str.range(of:"Some ")
let index = range!.upperBound
let subStr = String(str[index...])
Encryption Export Compliance for iOS apps
Disclaimer: I am not a lawyer. This is not legal advice, this is for information purposes only. Consult an attorney for legal guidance.
If your iOS app is simply using ATS or HTTPS to communicate with an external server then your app is using Encryption. As such you may need to submit a year-end self classification report to the US government. This is far-reaching as Apple is pushing to require ATS in all apps. The original deadline was Jan 1, 2017, however it has been extended indefinitely. These requirements would include simple apps that may be using an external SDK with ATS enabled for metrics or advertising such as Facebook SDKs.
iOS 11 App Store Search Results Include Developer Page
For iOS 11 Apple stated that the App Store will have Enhanced Search which will include “developers, in-app purchases, categories, editorial stories, tips and tricks, and collections”. In the past, if you searched for a developer name the App Store would show those developers’ apps in the search results.
In iOS 11 if you search for a developer by their name, the first search result will feature a page dedicated to that developer with a collage of icons generated from their apps. It appears that the most recently updated app icon is centered with the next recently updated app icons partially displayed around them. If the app developer only has a single app then that single app is displayed as normal without the developer page.
How to use Content Hosting for In-App Purchase Content
Apple allows apps developers to host their In-App Purchase Content on Apple’s servers. To set up Content Hosting you will need to use iTunes Connect, Xcode and the Application Loader. The IAP must be non-consumable to take advantage of content hosting.
iTunes Connect
Go to your app in iTunes Connect, then select Features, In-App Purchases. Create a new In-App Purchase or select an existing one. In the Content Hosting section, press “Turn On Content Hosting”.
How to create a Today Widget for your iOS App in Swift
This tutorial explains how to create a new Today Widget for iOS in Swift 3 using App Extensions in Xcode. It covers how to import pods, set up entitlements for inter-app communication via user defaults and custom url schemes. It also explains how to remove the existing storyboard and implement the today widget view programmatically instead of using Auto-Layout.
Create the Widget
First, Select your project and then create a new target via File, New, Target…
Deep Linking to the iOS App Store
Deep link to an app in the app store:
https://itunes.apple.com/app/id<APP_ID>
Deep link to an apps “Reviews” tab in the app store:
https://itunes.apple.com/WebObjects/MZStore.woa/wa/viewContentsUserReviews?id=<APP_ID>&pageNumber=0&sortOrdering=2&type=Purple+Software&mt=8
Deep link to an apps “Write a Review” page in the app store:
https://itunes.apple.com/app/id<APP_ID><span>?action=write-review</span>
Source: https://developer.apple.com/reference/storekit/skstorereviewcontroller/2851536-requestreview
Deep link to all apps by a developer in the app store:
itms-apps://itunes.apple.com/developer/<DEVELOPER_NAME>/id<DEVELOPER_ID>
Remember to replace <APP_ID> with the actual app’s Apple ID. Note that if you are deep linking from the iPhone or iPad you can replace the https:// with itms-apps:// to avoid a redirects.
iTunes Search API Country Codes
The iTunes Search API takes a country code. There are 28 languages that the iOS App Store can be localized into. Below are the ISO 3166-1 alpha-2 country codes for 25 of the main countries that can be used in the country parameter in the iTunes Search API.
CN DK NL AT CA US GB FI FR DE GR ID IT JP KR MY BR PT RU MX ES SE TH TR VN
How to align UIView to topLayoutGuide in SnapKit
Use topLayoutGuide.snp.bottom to align your UIView to the bottom of the navigation bar or the bottom of the status bar in Swift 3 while using the SnapKit pod.
Use bottomLayoutGuide.snp.top to align your UIView to the top of the tab bar.
iOS views/APIs and their corresponding Android views/APIs
If you are used to programming in iOS and need to write an Android app or vice versa here is a list of iOS views and their equivalent views on android. You can also use this list to infer the corresponding View Controller and Activity.
| iOS |
| UITableView |
| UICollectionView |
API’s below
| iOS |
| MPNowPlayingInfoCenter |
| MPRemoteCommandCenter |
| NSNotificationCenter |
| NSTimer |
How to programmatically play audio even when iOS device is muted
If you want to play the sound from a video or audio clip even when the iPhone or iPad device is muted you can use AVAudioSession to accomplish the task. This will make your app work similar to YouTube.
You will want to set the AVAudioSession category to AVAudioSessionCategoryPlayback. The session is a singleton so you only need to set it once, either shortly after app launch or prior to your audio or video playing.
How to add a new user to your iTunes Connect account
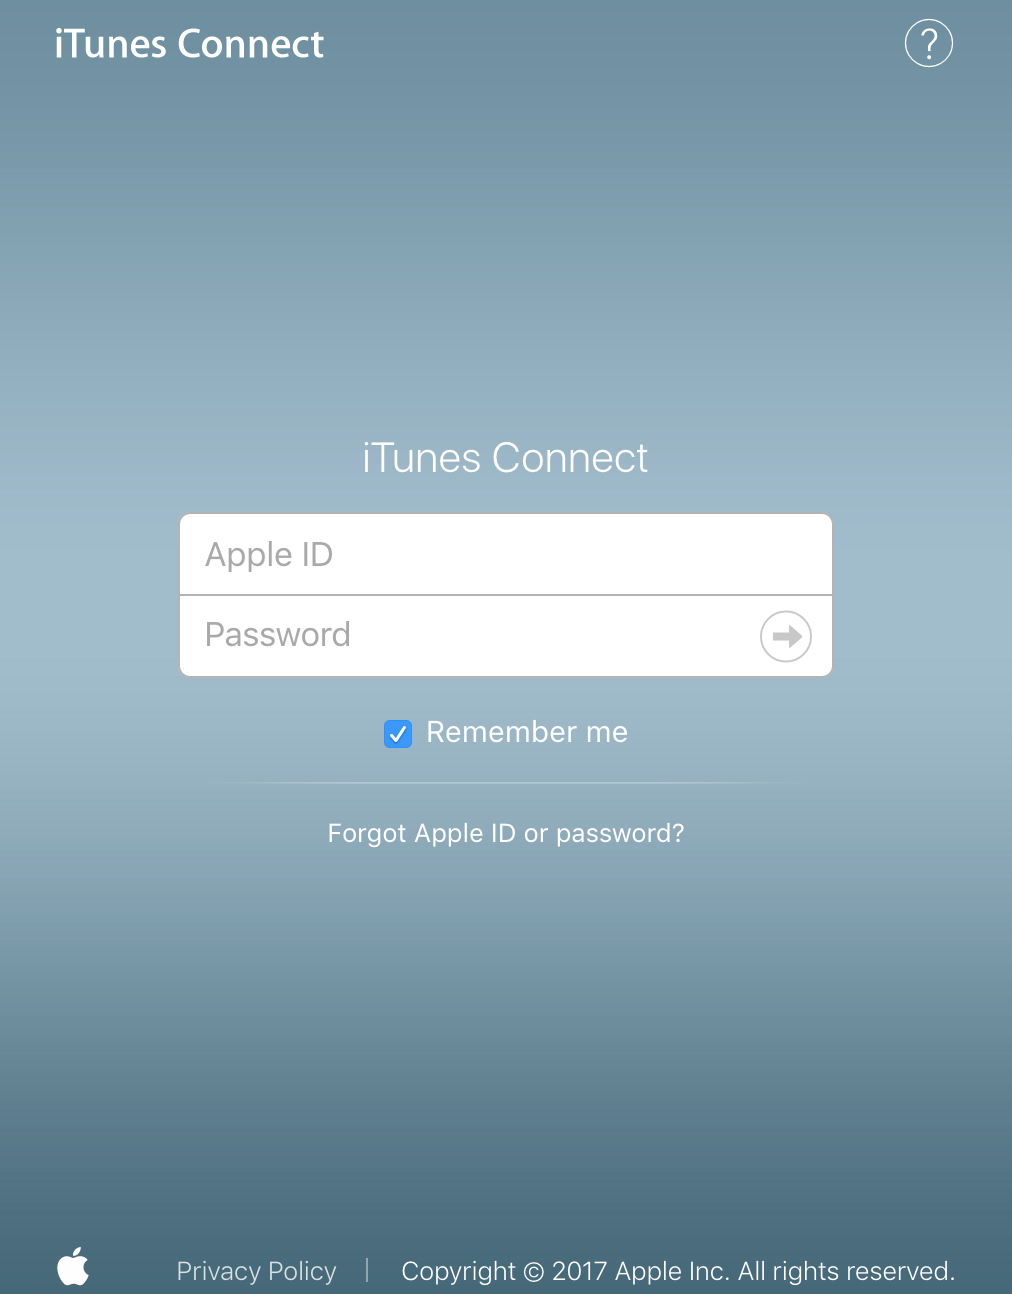
First go to https://itunesconnect.apple.com/ and login.
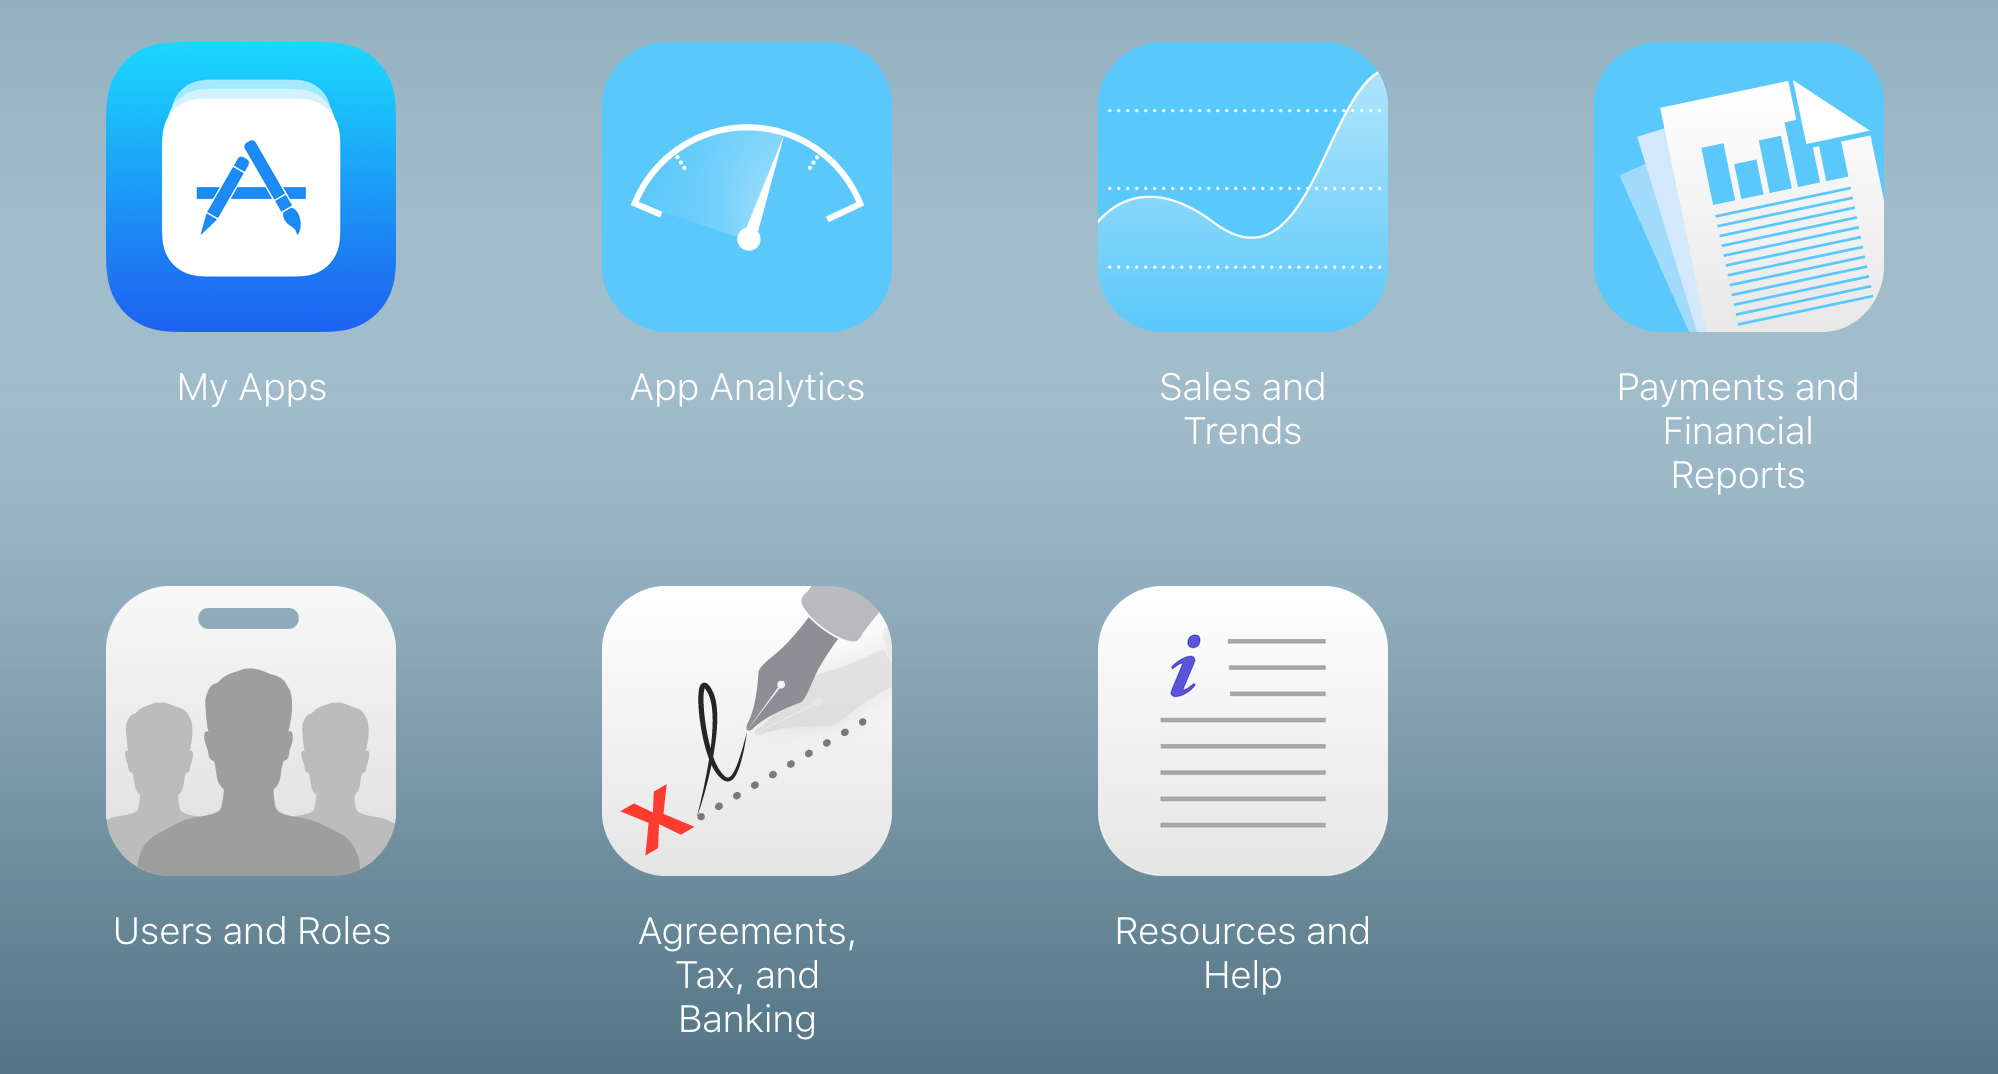
Second, select the “Users and Roles” icon.
Third, press the + plus button to the right of User () to add a new user. Enter their name and email address.
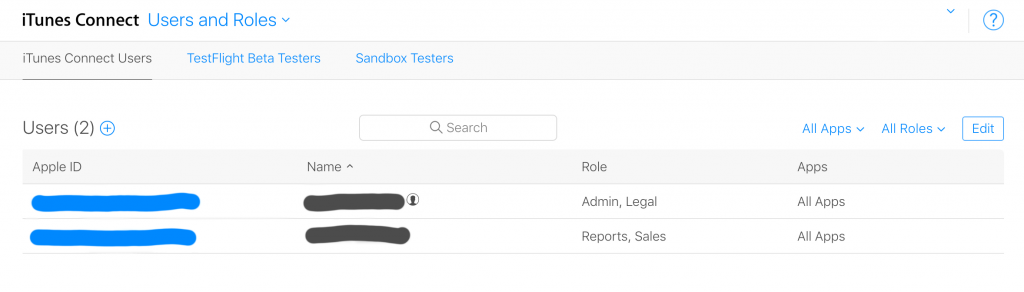
Select the role or roles to give the new user.
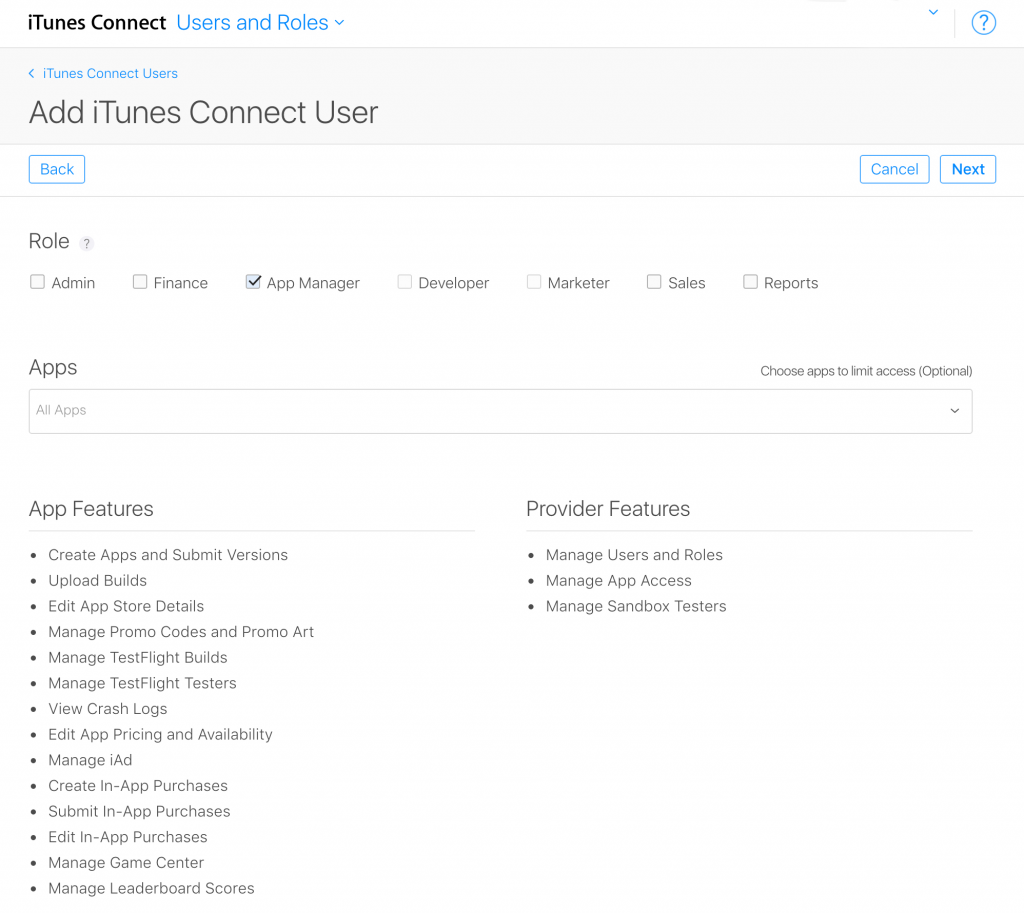
Lastly, select which email notifications they should receive.
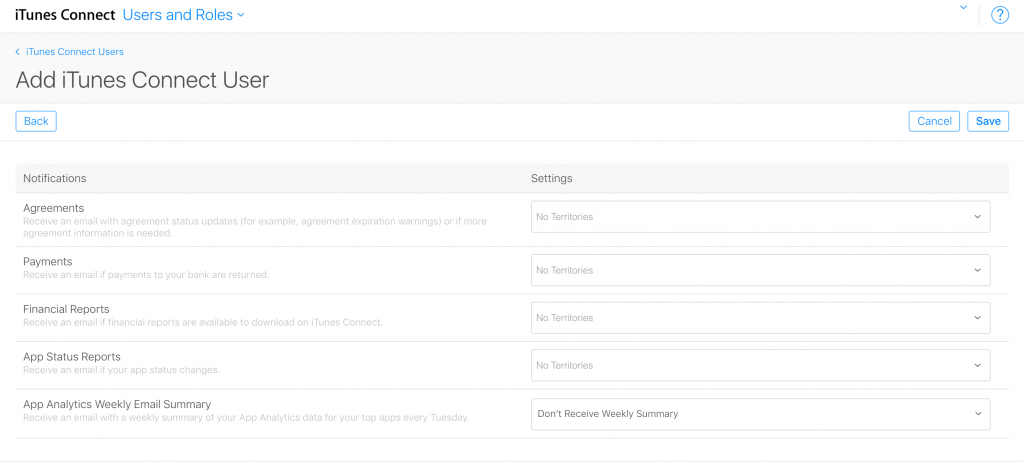
If you are hooking up a cloud reporting service such as App Annie or appfigures to your iTunes account, you should probably create a new user with the Sales and Reports Roles only.
How to use the Attribution API for tracking installs via Apple Search Ads
Apple Search Ads is one of the many new introductions to the App Store for 2016. The new search ads allow developers and marketers to promote their iOS Apps at the top of App Store search results by bidding on search keywords.
You bid on how much you are willing to pay for a user to tap on your ad. For the most part you want to keep the average cost per acquisition (Avg CPA) below the lifetime value of a user. Lloyd Melnick blog defines LTV as consisting of three components: monetization, retention and virality. If you have a premium or paid up front app the monetization calculation is fairly straight forward, as it is simply the price of the app minus Apple’s 30% cut and any applicable taxes.
Dynamic Type in iOS using UIFontTextStyle
iOS 7 introduced Dynamic Type which allows the user to specify the font size in Settings. The easiest way to support dynamic type is to use one of Apple’s pre defined Font Text Style’s below.
Swift 3 and Swift 4
UIFontTextStyle.title1
UIFontTextStyle.title2
UIFontTextStyle.title3
UIFontTextStyle.headline
UIFontTextStyle.subheadline
UIFontTextStyle.body
UIFontTextStyle.callout
UIFontTextStyle.footnote
UIFontTextStyle.caption1
UIFontTextStyle.caption2
Swift 2.2
UIFontTextStyleTitle1
UIFontTextStyleTitle2
UIFontTextStyleTitle3
UIFontTextStyleHeadline
UIFontTextStyleSubheadline
UIFontTextStyleBody
UIFontTextStyleCallout
UIFontTextStyleFootnote
UIFontTextStyleCaption1
UIFontTextStyleCaption2
Here is a code example in Swift 3 or Swift 4 of using the Headline font style.
How to open an iOS app with custom URL
This tutorial shows you how to open another iOS app from within your iOS app or from the safari browser using a custom URL scheme.
Beginning with iOS 9, you must whitelist the apps you want to open. If you do not, you will get the error -canOpenURL: failed for URL: “customURLScheme://” – error: “This app is not allowed to query for scheme”. If you get this error skip to the beginning of step 3.
How to localize an app’s name with InfoPlist.strings
These instructions are for localizing the information contained in the Info.plist. This includes the app’s name which is displayed on the user’s home screen under your app icon.
- In Xcode go to File, New, File..
- Select iOS (or the platform you are working with), Resource, Strings File, Next.
- Name the file InfoPlist.strings (case sensitive).
- If you only plan on having one App name for your project then I recommend placing the file in the same directory as your Localizable.strings file. However, if you have multiple targets and some of them use different app names then you will want to create a separate directory for the InfoPlist.strings file. You will then need to create a separate InfoPlist.strings file for each app name and associate it with the correct target.
- Select the newly created InfoPlist.strings file and add the following key, value pairs:
"CFBundleDisplayName" = "Your App Name";    //App name as displayed below app icon
"CFBundleName" = "Your App Name"    //Short app name, should be 16 characters or less
How to Localize an iOS or tvOS app in Swift or Objective-C
Localization is the translation of the app’s user interface into locale specific languages. In order to support localization we will use a strings file.
Creating a Localizable.strings file
I like to place the strings file in its own folder called “Resources”.
In Xcode, Select “File”, “New”, “File…”
In the template picker select the “Resource” for the appropriate OS. Select “Strings File”.
Name the file “Localizable.strings”. This is the iOS default naming convention, don’t name it something else unless you want to refer to it by name every time you need to reference it.
How to create promo codes for your iOS or tvOS paid app or in-app purchase
Promo codes allow you to give away your paid app for free. They are mainly used for sending your app to journalists or bloggers so that they can review your app at no cost to them. You can also send them to your friends or reward those who made some contribution to the apps development. Developers can generate up to 100 promo codes per version. Each code expires 28 days after generation or when you release a new version of the app, whichever comes first.
How to enable Universal Links in iOS 9+
Apple’s documentation states that “Adding support for universal links is easy. There are three steps you need to take”. However, there is much more to it than that. Here is what you really need to do.
apple-app-site-association file
Create the apple-app-site-association file and place it at the root of your webserver or the .well-known subdirectory.
{
    "applinks": {
        "apps": [],
        "details": [
            {
                "appID": "9JA89QQLNQ.com.apple.wwdc",
                "paths": [ "/wwdc/news/", "/videos/wwdc/2015/*"]
            },
            {
                "appID": "ABCD1234.com.apple.wwdc",
                "paths": [ "*" ]
            }
        ]
    }
}
The appId is your App Prefix or Team Id followed by the Bundle ID. You can get this from https://developer.apple.com/account/#/membership/ and look for the Team ID value.
Localize iOS project with Strings file
File..New File
From the appropriate platform, choose Resource, Strings File
Name it “Localizable.strings”.
Add your key value pairs as such:
"HELLO_WORLD" = "Hello World!";
In code add your localized string with:
Swift
NSLocalizedString("HELLO_WORLD", comment: "")
Objective-C
NSLocalizedString(@"HELLO_WORLD", nil);
To add additional languages go to your project..Info..Localizations.
Press the + button to add new languages.
Did you find this post helpful? Support independent development and improve your sleep by downloading White Noise and Deep Sleep Sounds free from the App Store.
Remove storyboard from iOS or tvOS and design programmatically
If you prefer to work with code programmatically instead of via Storyboards then this tutorial will help you start a brand new iOS or tvOS project by removing the default main storyboard.
From Xcode, select File…New…Project. (iOS/tvOS)…Application…Single View Application…Next.
Give your project a title. Select the appropriate checkmarks for Core Data and testing. Press Next.
Delete Main.storyboard and select Move to Trash.
Select the project from the Project Navigator. Select the Target. Under General…Deployment Info…Main Interface, delete “Main”.
25 Useful Tools for iOS Software Developers
As a software developer or marketer of iOS apps we rely on our tools to help build our products and save us time. Below are 25 useful tools for building iOS apps.
| Name |
| ack |
| Affinity Designer |
| AppCode |
| AppWage |
| Audacity |
| CocoaPods |
| Cyberduck |
| Delete Contacts+ |
| DreamShot |
| Eclipse |
| Fastlane |
| iExplorer |
| iMovie |
| Phabricator |
| Postman |
| QuickTime |
| ScreenFlow 7 |
| SimPholders |
| Simulator Status Magic |
| Sketch |
| SourceTree |
| SQLite Professional |
| Textmate |
| Tunnelblick |
| QuickBooks Self-Employed |
| Xcode |
iTunes Connect API (fastlane) and corresponding Xcode language codes
If you are using the iTunes Connect API via fastlane or spaceship and would like to access your app meta data by language, below is a chart of the language codes that spaceship converts the iTunes Connect languages into. In addition, if you are localizing your app in Xcode for multiple locales of the same language. You should probably use the base language and omit the locale for at least one locale so that any other locales you omit have a fall back language to use. I’ve also included the language codes that Google Translate’s API uses if you decide to use machine translation.
Use plutil to find that missing double quote or semicolon in your Localizable.strings file
Is Xcode giving you the error in Localizable.strings “Read failed: The data couldn’t be read because it isn’t in the correct format.” but it isn’t telling you what line the error is on?
Use the command line tool plutil to find that missing semicolon or double quote.
cd to the directory of the offending Localizable.strings file and run
plutil -lint Localizable.strings
It should respond with something like:
CFPropertyListCreateFromXMLData(): Old-style plist parser: missing semicolon in dictionary on line 86. Parsing will be abandoned. Break on _CFPropertyListMissingSemicolon to debug.
How to specify tvOS target conditional in Swift and Objective-C
In Swift use:
#if os(tvOS)
    //tvOS code here
#elseif os(iOS)
    //iOS code here
#endif
In Objective-C use:
#if TARGET_OS_TV
    //tvOS code here
#else TARGET_OS_IOS
    //iOS code here
#endif
Did you find this post helpful? Support independent development and improve your sleep by downloading White Noise and Deep Sleep Sounds free from the App Store.
How to use core data from existing iOS app with tvOS
In Apple’s new tvOS, data saved in core data is not persisted but is only cached. The tvOS may delete the data stored in core data when space is low.
From https://developer.apple.com/library/tvos/documentation/General/Conceptual/AppleTV_PG/
Local Storage for Your App Is Limited
The maximum size of an Apple TV app is limited to 200 MB. Moreover, your app can only access 500 KB of persistent storage that is local to the device (using the NSUserDefaults class). Outside of this limited local storage, all other data must be purgeable by the operating system when space is low. You have a few options for managing these resources:
How to specify DEBUG and RELEASE flags in Xcode with Swift or Objective-C
This tutorial shows you how to selectively run your debug or production code using flags. Sometimes you may find it necessary to only run some code in Debug mode and other code in Release mode.
Swift
- Open your Project Build Settings and search for “Swift Compiler – Custom Flags” … “Other Swift Flags”.
- Add
-DDEBUGto the Debug section - Add
-DRELEASEto the Release section
- In Swift you can use the following code:
#if RELEASE
    // release only code
#else
    // debug only code
#endif
or
#if DEBUG
    // debug only code
#else
    // release only code
#endif
Objective-C
- In Objective-C, the DEBUG flag is already defined as a preprocessor macro. However, you will need to add the RELEASE flag by going to your Project Build Settings and searching for
Preprocessor Macros. - Add
RELEASE=1to the Release section - In Objective-C you can ue the following code:
#ifdef RELEASE
    // release only code
#else
    // debug only code
#endif
or
#ifdef DEBUG
    // debug only code
#else
    // release only code
#endif
How to add CocoaPods acknowledgements plist to iOS settings
This tutorial will explain how to add the automatically generated CocoaPods acknowledgements plist file to your app’s iOS settings page.
CocoaPods automatically creates an acknowledgements markdown and plist file with the license information of all the pods in you project. You can use the plist file to create an acknowledgements section in the iOS settings for your app.
Note: There is a bug in Xcode 7.2 UI for creating a Child Pane. Below is a workaround.
Category: kiteboarding
How to make your kiteboard more visible in the water so you don’t lose it
Have you ever lost your kiteboard? Have you ever spent way too long body dragging around the water because your board flipped fins up and you couldn’t spot it?
Well, today I have a tip that will help make your board easier to find when bobbing in the water. Simply, spray paint your fins fluorescent orange for maximum visibility.
Tools and Materials
1 can of fluorescent orange spray paint
some cardboard
Category: news
How to use stickers in iMessage for iOS 10
Apple released iOS 10 in September 2016, along with a new iMessage app store featuring stickers and mini apps. How do you get to this new store you ask?
First, open iMessage, then press the grey and white arrow to the left of your text input box.

Second, press the third icon from the left for the new iMessage App Store.

Lastly, press the icon on the bottom left of the screen represented by four gray ovals.
Deep Sleep Fan for iOS simulates a real fan to help you sleep

Many people sleep with a fan on to drown out other noises. However, this is inconvenient when one is traveling or the room is already cold.
Exit: fan, Enter: Deep Sleep Fan.
This new app simulates a fan with the option to play at two different speeds. It has a unique oscillation mode which pans the sounds between the left and right speakers. In addition, it introduces a fader which is adjustable for up to one hour.
Bedtime Reminder and Wake Alarm built into iOS 10 Clock App
Apple’s Clock application gets an update in iOS 10. It uses a new dark theme for the whole app and includes a new Bedtime tab. Starting the Bedtime section for the first time causes the app to ask you a few questions such as “What time would you like to wake up?”, “Which days of the week should the alarm go off?”, “How many hours of sleep do you need each night?”, “When would you like a bedtime reminder?”, and “What do you want to hear when you wake up?”.
White Noise and Deep Sleep Sounds, Now Available for iOS and Apple TV
Helps You and Your Baby Fall Asleep Faster and for a Longer Duration
Kitefaster, an independent development studio, today released a free version of the “White Noise and Deep Sleep Sounds” app for Apple TV. The app was a finalist in the ports category of the Apple TV App Challenge presented by AppLovin. The developer originally wrote the App to help his newborn baby fall asleep. However, the sounds are useful for relaxing and studying as well. The iOS version is also great for travelers that stay in noisy hotels and don’t want to lug around a sound machine.
Category: other
iOS App Preview Video Resolutions and Sizes
App Preview Resolutions
How to add custom fonts to your iOS app in Swift with UIFont
This tutorial will give an example of how to add a custom font to your iOS app that you can use in UIFont, UILabel, UITextView, etc.
- Open Info.plist
- Right click and choose “Add Row”.
- Start typing and select “Fonts provided by application”.
- Expand the row and next to Item 0 in the Value field enter the name of the font.
- Don’t forget to add the font file to your project and set its target. You can place it in a new folder called “Resources”.
Maximum String Length for Common Database Fields
When designing a database schema you often have to make decisions on a fields length. Rather then just guess at a number, use the maximum possible value that could conceivably be used for the field. Below is a chart of common database fields such as email address, city, zip code and country name and the maximum possible length value that can be used.
| Field Name |
| email address |
| city |
| zip code |
| country |
How to set the name of the sender/from/source in Amazon SES
If you are using Amazon Simple Email Service via AWS you can make your emails appear more professional by setting the from name to either a person or company name instead of just the from email address.
To accomplish this via the command line, SDK, or API simply replace the source email address “[email protected]” with “Company Name [email protected]”.
Category: sleep
Deep Sleep Fan for iOS simulates a real fan to help you sleep
Many people sleep with a fan on to drown out other noises. However, this is inconvenient when one is traveling or the room is already cold.
Exit: fan, Enter: Deep Sleep Fan.
This new app simulates a fan with the option to play at two different speeds. It has a unique oscillation mode which pans the sounds between the left and right speakers. In addition, it introduces a fader which is adjustable for up to one hour.
Bedtime Reminder and Wake Alarm built into iOS 10 Clock App
Apple’s Clock application gets an update in iOS 10. It uses a new dark theme for the whole app and includes a new Bedtime tab. Starting the Bedtime section for the first time causes the app to ask you a few questions such as “What time would you like to wake up?”, “Which days of the week should the alarm go off?”, “How many hours of sleep do you need each night?”, “When would you like a bedtime reminder?”, and “What do you want to hear when you wake up?”.
Turn an old iPhone, iPad or iPod into a Sound Machine for White Noise
Do you have an old iPhone, iPad or iPod you aren’t using lying around. You can turn it into a sound machine for a nursery and keep your newer device in your own room. Simply download a white noise app such as White Noise and Deep Sleep Sounds for free on the App Store.
Depending on the placement of the device and the distance to the bed or crib you might want to attach an external speaker. I previously used an iPad as the sound machine by itself but later switched to using an iPod. Since the iPod wasn’t that loud and had a really short battery life I needed to get an external speaker and charger. Pictured below is the new setup with an iHome iM59WC Rechargeable Color Changing Mini Speaker and a iClever BoostCube 4.8A 24W Dual USB Travel Wall Charger.
White Noise and Deep Sleep Sounds, Now Available for iOS and Apple TV
Helps You and Your Baby Fall Asleep Faster and for a Longer Duration
Kitefaster, an independent development studio, today released a free version of the “White Noise and Deep Sleep Sounds” app for Apple TV. The app was a finalist in the ports category of the Apple TV App Challenge presented by AppLovin. The developer originally wrote the App to help his newborn baby fall asleep. However, the sounds are useful for relaxing and studying as well. The iOS version is also great for travelers that stay in noisy hotels and don’t want to lug around a sound machine.
Category: tvos development
Dynamic Type in iOS using UIFontTextStyle
iOS 7 introduced Dynamic Type which allows the user to specify the font size in Settings. The easiest way to support dynamic type is to use one of Apple’s pre defined Font Text Style’s below.
Swift 3 and Swift 4
UIFontTextStyle.title1
UIFontTextStyle.title2
UIFontTextStyle.title3
UIFontTextStyle.headline
UIFontTextStyle.subheadline
UIFontTextStyle.body
UIFontTextStyle.callout
UIFontTextStyle.footnote
UIFontTextStyle.caption1
UIFontTextStyle.caption2
Swift 2.2
UIFontTextStyleTitle1
UIFontTextStyleTitle2
UIFontTextStyleTitle3
UIFontTextStyleHeadline
UIFontTextStyleSubheadline
UIFontTextStyleBody
UIFontTextStyleCallout
UIFontTextStyleFootnote
UIFontTextStyleCaption1
UIFontTextStyleCaption2
Here is a code example in Swift 3 or Swift 4 of using the Headline font style.
How to localize an app’s name with InfoPlist.strings
These instructions are for localizing the information contained in the Info.plist. This includes the app’s name which is displayed on the user’s home screen under your app icon.
- In Xcode go to File, New, File..
- Select iOS (or the platform you are working with), Resource, Strings File, Next.
- Name the file InfoPlist.strings (case sensitive).
- If you only plan on having one App name for your project then I recommend placing the file in the same directory as your Localizable.strings file. However, if you have multiple targets and some of them use different app names then you will want to create a separate directory for the InfoPlist.strings file. You will then need to create a separate InfoPlist.strings file for each app name and associate it with the correct target.
- Select the newly created InfoPlist.strings file and add the following key, value pairs:
"CFBundleDisplayName" = "Your App Name";    //App name as displayed below app icon
"CFBundleName" = "Your App Name"    //Short app name, should be 16 characters or less
How to Localize an iOS or tvOS app in Swift or Objective-C
Localization is the translation of the app’s user interface into locale specific languages. In order to support localization we will use a strings file.
Creating a Localizable.strings file
I like to place the strings file in its own folder called “Resources”.
In Xcode, Select “File”, “New”, “File…”
In the template picker select the “Resource” for the appropriate OS. Select “Strings File”.
Name the file “Localizable.strings”. This is the iOS default naming convention, don’t name it something else unless you want to refer to it by name every time you need to reference it.
How to create promo codes for your iOS or tvOS paid app or in-app purchase
Promo codes allow you to give away your paid app for free. They are mainly used for sending your app to journalists or bloggers so that they can review your app at no cost to them. You can also send them to your friends or reward those who made some contribution to the apps development. Developers can generate up to 100 promo codes per version. Each code expires 28 days after generation or when you release a new version of the app, whichever comes first.
CLLocationManager and tvOS
How to access the user’s location with CLLocationManager on tvOS.
- Add the key
NSLocationWhenInUseUsageDescriptionto your Info.plist. Also add a default value that will be displayed in the prompt to the user. - Add the key
CFBundleDisplayNameto your Info.plist. Also add a default value that will be displayed as the App name in the home screen and in the prompt. - Localize your prompt and display name by adding a InfoPlist.strings file. This file can be located in the same directory as your Localizable.strings file.
- Add
NSLocationWhenInUseUsageDescriptionandCFBundleDisplayNameas keys and localize their values.
- Add
Remove storyboard from iOS or tvOS and design programmatically
If you prefer to work with code programmatically instead of via Storyboards then this tutorial will help you start a brand new iOS or tvOS project by removing the default main storyboard.
From Xcode, select File…New…Project. (iOS/tvOS)…Application…Single View Application…Next.
Give your project a title. Select the appropriate checkmarks for Core Data and testing. Press Next.
Delete Main.storyboard and select Move to Trash.
Select the project from the Project Navigator. Select the Target. Under General…Deployment Info…Main Interface, delete “Main”.
25 Useful Tools for iOS Software Developers
As a software developer or marketer of iOS apps we rely on our tools to help build our products and save us time. Below are 25 useful tools for building iOS apps.
| Name |
| ack |
| Affinity Designer |
| AppCode |
| AppWage |
| Audacity |
| CocoaPods |
| Cyberduck |
| Delete Contacts+ |
| DreamShot |
| Eclipse |
| Fastlane |
| iExplorer |
| iMovie |
| Phabricator |
| Postman |
| QuickTime |
| ScreenFlow 7 |
| SimPholders |
| Simulator Status Magic |
| Sketch |
| SourceTree |
| SQLite Professional |
| Textmate |
| Tunnelblick |
| QuickBooks Self-Employed |
| Xcode |
Use plutil to find that missing double quote or semicolon in your Localizable.strings file
Is Xcode giving you the error in Localizable.strings “Read failed: The data couldn’t be read because it isn’t in the correct format.” but it isn’t telling you what line the error is on?
Use the command line tool plutil to find that missing semicolon or double quote.
cd to the directory of the offending Localizable.strings file and run
plutil -lint Localizable.strings
It should respond with something like:
CFPropertyListCreateFromXMLData(): Old-style plist parser: missing semicolon in dictionary on line 86. Parsing will be abandoned. Break on _CFPropertyListMissingSemicolon to debug.
Useful tvOS developer links
Mastering the tvOS Focus Engine by airbnb
Detecting Gestures and Button Presses by Apple
iOS to tvOS Tips by 3 Sided Cube
How to specify tvOS target conditional in Swift and Objective-C
In Swift use:
#if os(tvOS)
    //tvOS code here
#elseif os(iOS)
    //iOS code here
#endif
In Objective-C use:
#if TARGET_OS_TV
    //tvOS code here
#else TARGET_OS_IOS
    //iOS code here
#endif
Did you find this post helpful? Support independent development and improve your sleep by downloading White Noise and Deep Sleep Sounds free from the App Store.
How to use core data from existing iOS app with tvOS
In Apple’s new tvOS, data saved in core data is not persisted but is only cached. The tvOS may delete the data stored in core data when space is low.
From https://developer.apple.com/library/tvos/documentation/General/Conceptual/AppleTV_PG/
Local Storage for Your App Is Limited
The maximum size of an Apple TV app is limited to 200 MB. Moreover, your app can only access 500 KB of persistent storage that is local to the device (using the NSUserDefaults class). Outside of this limited local storage, all other data must be purgeable by the operating system when space is low. You have a few options for managing these resources:
Category: wordpress
How to Fix the Error Establishing a Database Connection in WordPress
If your WordPress server works normal for a few days and then shows the error message “Error Establishing a Database Connection” it is most likely due to heavy load to your website that your server could not handle. The extra load could be due to a lot of traffic from an incoming link or it could be a malicious actor attempting to brute force their way into your WordPress installation. If you have control of the server such as on AWS or Digital Ocean you can ssh into the server and restart the machine. But that fix is only temporary.